![[Workshop] สร้าง Workflow AI ตอบอีเมลลูกค้าแบบอัตโนมัติด้วย Activepieces ฟรี](https://datayolk.net/wp-content/uploads/2025/02/Activepieces-OG-1024x538.webp)
บทความนี้เป็นบทความประกอบ Video สร้าง AI ตอบอีเมลลูกค้าแบบอัตโนมัติด้วย Activepieces
Activepieces คือเครื่องมือทำ Automation แบบ No-Code สามารถสร้างระบบอัติโนมัติของตัวเองเพื่อลดงานซ้ำซ้อนที่ทำซ้ำ ๆ แล้วอาจจะเกิดความผิดพลาดได้ง่าย โดยมีจุดเด่นที่โปรแกรมเป็น Open Source ใช้งานได้ฟรี และรองรับการเชื่อมต่อกับ Gen AI อย่าง ChatGPT, Claude และอื่น ๆ ดูวีดีโอแนะนำ Activepieces ได้ที่นี่
ปรึกษาปัญหา หรืออยากเห็นเคสตัวอย่างจากผู้ใช้จริง ให้เข้าร่วมกลุ่ม Facebook Activepieces Facebook Community
ที่มาและความสำคัญ / Project Overview
ปัญหาและความต้องการ:
- แผนกขายได้รับอีเมลสอบถามเกี่ยวกับสินค้า (ในโปรเจคตัวอย่างคือ แชมพูสระผม) และวิธีการสั่งซื้อจากลูกค้าเป็นจำนวนมาก ปัจจุบันต้องใช้พนักงานตอบกลับทีละอีเมล หรือใช้ Template ที่ต้องแก้ไขรายละเอียดบางส่วนก่อนส่ง ซึ่งใช้เวลานาน และอาจเกิดข้อผิดพลาดได้
เป้าหมายของ Project:
- สร้าง Workflow ด้วย Activepieces ที่ใช้ระบบ AI มาช่วยร่างคำตอบอีเมลที่เกี่ยวกับรายละเอียดสินค้าโดยอัตโนมัติ เพื่อลดความผิดพลาดในการตอบกลับอีเมลลูกค้า และสามารถให้ข้อมูลสินค้าที่เป็นปัจจุบันอยู่เสมอ
ประโยชน์ที่คาดว่าจะได้รับ:
- ลดเวลาและแรงงานของพนักงานในการตอบอีเมลทีละฉบับ
- ลดความผิดพลาดที่อาจเกิดขึ้นจากการใช้ Template และการแก้ไขข้อมูลด้วยมือ
- เพิ่มประสิทธิภาพในการตอบสนองต่อคำถามของลูกค้า
สิ่งที่ต้องเตรียม / Project Prerequisites
- Activepieces account
สมัครเข้าใช้งานที่นี่ https://activepieces.com/ - Gmail account
- OpenAI account (ใช้ OpenAI API ซึ่งต้องมีการผูกบัญชีธนาคาร)
ขั้นตอนการลงมือทำ / How to
1. สร้าง Flow ใน Activepieces

เปิด Flow / Project ใหม่ใน Activepieces
- เข้าสู่ระบบ Activepieces
- ไปที่ Menu Flows และกด New Flow
- กดสร้าง + From scratch
2. ลองส่ง Email ตัวอย่างเพื่อทดสอบ
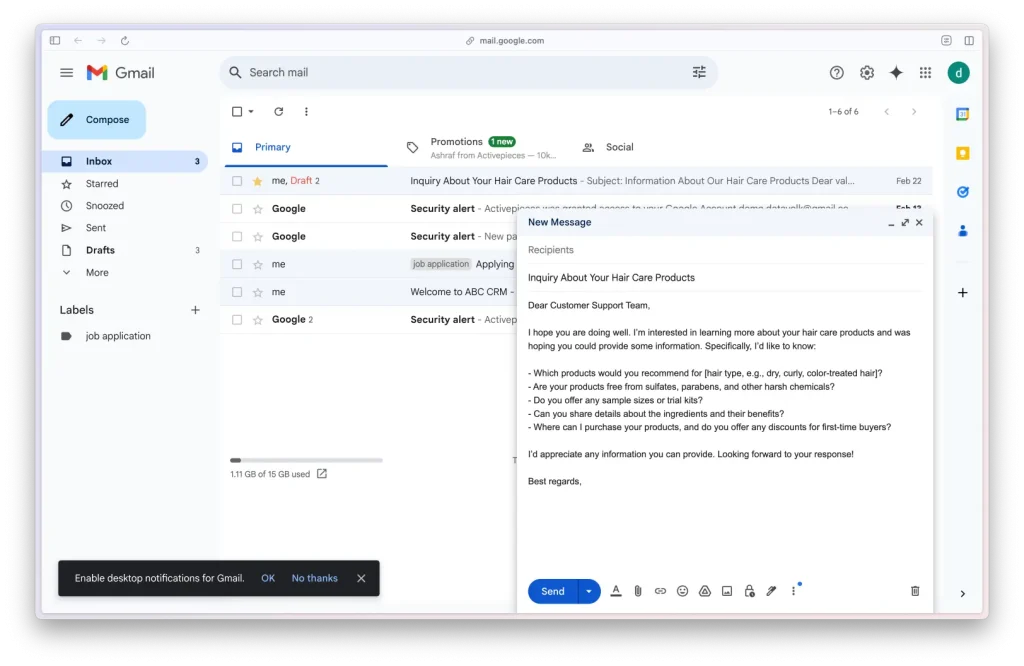
ลองส่ง Email ตัวอย่างเพื่อจำลองเป็นลูกค้าที่เข้ามาสอบถามข้อมูลสินค้าเข้าไปใน Email ของตัวเองเพื่อใช้ใน Project นี้ (ส่งอีเมลหาตัวเอง) โดยมีรายละเอียดดังนี้
- To (ผู้รับ): Email ของตัวเอง
- Subject:
Inquiry About Your Hair Care Products - Email Body (รายละเอียดในอีเมล)
Dear Customer Support Team,

I hope you are doing well. I’m interested in learning more about your hair care products and was hoping you could provide some information. Specifically, I’d like to know:

- Which products would you recommend for [hair type, e.g., dry, curly, color-treated hair]?
- Are your products free from sulfates, parabens, and other harsh chemicals?
- Do you offer any sample sizes or trial kits?
- Can you share details about the ingredients and their benefits?
- Where can I purchase your products, and do you offer any discounts for first-time buyers?

I’d appreciate any information you can provide. Looking forward to your response!

Best regards,
3. เลือก Trigger ให้ทำงานเมื่อมี New Email

เพิ่ม Trigger ให้ Flow นี้ทำงานเมื่อมี New Email เข้ามาใน Gmail Account ที่เรากำหนด
- กด Select Trigger แล้วเลือก Gmail → New Email
- ใน New Email Node
- กดเลือก Connection ใน New Email Node เพื่อเลือก Gmail Account ที่ต้องการเชื่อมต่อ ในการอ่านข้อความใน Email
- ใส่ Subject เป็น Inquiry About Your Hair Care Products
- กด Generate Sample Data เพื่อทดสอบการอ่านข้อมูลใน Email ซึ่งควรจะเห็นข้อมูลใน Email ของขั้นตอนก่อนหน้า
4. เลือก Send Email Node ให้ Send Draft Email

- กดปุ่ม + ตรง Flow แล้วเลือก Gmail → Send Email
- ใน Send Email Node
- กดเลือก Connection เพื่อเลือก Gmail Account ที่ต้องการเชื่อมต่อ ในการส่ง Email (ต้องเป็น Email เดียวกับขั้นตอนก่อนหน้า)
- เลือก Receiver Email (To) หรือผู้รับอีเมล โดยการดึงข้อมูลผู้ส่ง (ลูกค้า) จาก New Email
- เลือก New Email => message ⇒ headers ⇒ from ⇒ value ⇒ value[1] ⇒ address
- ใส่ข้อความใน Subject เป็นหัวข้อการตอบกลับ โดยเลือก
- เลือก New Email => message => headers => subject
- ใส่ข้อความใน Body เพื่อทดสอบการส่ง Email
"Test from Activepieces" - เลือก Create draft
- กด Test Step เพื่อลองสร้าง Draft Email
- ตรวจสอบผลลัพธ์ใน Email ของตัวเอง
5. ปรับ Send Email Node ให้ Reply Draft Email
จากขั้นตอนก่อนหน้าจะเป็นการ Draft การส่ง Email ใหม่ ในขั้นตอนจะปรับให้ สามารถ Draft การ Reply ใน Email อันเดิมได้
- ใน Send Email Node
- เลือก In reply to โดยเลือกจาก message-id
- New Email => message ⇒ headers ⇒ message-id
- เลือก In reply to โดยเลือกจาก message-id
- กด Test Step เพื่อลองสร้าง Draft Email
- ตรวจสอบผลลัพธ์ใน Email ของตัวเอง
6. ใช้ ChatGPT ร่าง Draft Email ให้
ในขั้นตอนก่อนหน้าเป็นการสร้าง Draft Reply Email โดยข้อความข้างในเป็นข้อความสมมติในขั้นตอนถัดไปจะเชื่อมต่อกับ Generative AI เพื่อให้ช่วยร่างเนื้อหาในอีเมลให้อัตโนมัติ
6.1 เปิดใช้งาน OpenAI API
ในการใช้งาน ChatGPT ซึ่งเป็น Generative AI ประเภทหนึ่ง เราจะใช้งานผ่าน OpenAI ซึ่งต้องมี ChatGPT Account ของตัวเองก่อน และสร้าง API Key ดังนี้ (ซึ่งต้องผูกกับบัญชีบัตรเครดิตก่อนใช้งาน)
- เข้าไปที่ https://platform.openai.com/account/api-keys.
- กดสร้าง New Secret Key
- นำ API Key ที่ได้ไปใช้ในขั้นตอนถัดไป
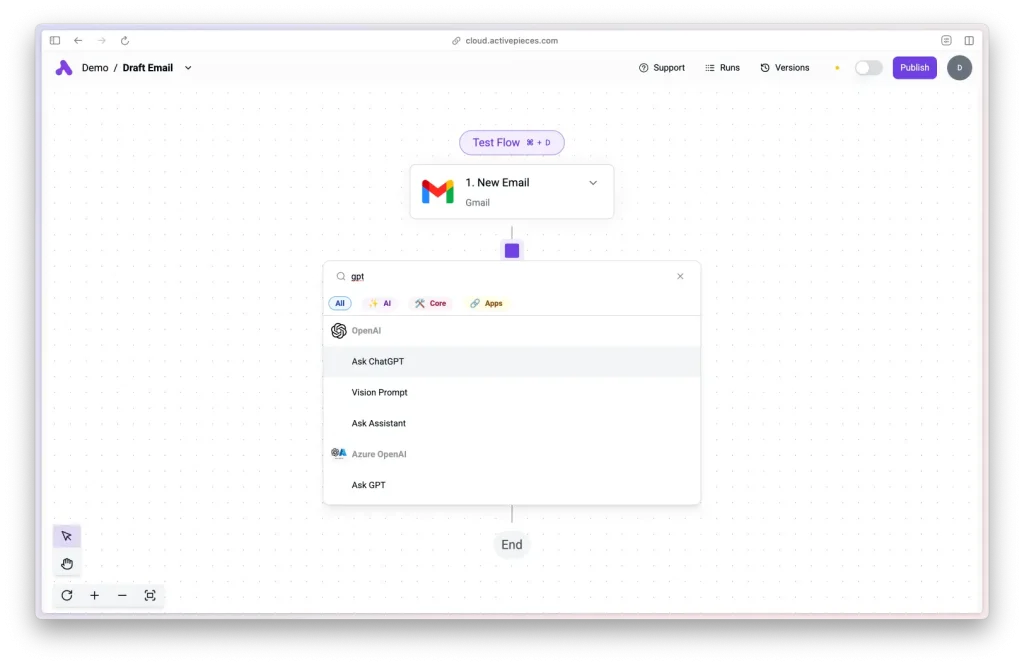
6.2 สร้าง Node Ask ChatGPT เพื่อใช้งาน ChatGPT
สร้าง Node Ask ChatGPT แทรกตรงกลางระหว่าง New Email กับ Send Email โดยตั้งค่าให้ Flow สามารถส่งข้อมูลใน Email ไปให้ ChatGPT ช่วยร่าง Email ตอบกลับให้ มีรายละเอียดดังนี้
- เลือก API Key ตอนสร้าง Secret Key ข้างต้น
- เลือก Model:
gpt-4o - ใส่ข้อมูล Question:
- “Try to response this email”
- ดึงข้อมูล Subject และ Email Body เพื่อให้ AI อ่านข้อความได้
- เลือก New Email => message => headers => subject
- เลือก New Email => message => text
- ใส่ข้อมูล Temperature เป็น
0.1 - Roles
การใส่ Prompt เพื่อสั่งการให้ AI ทำตามที่เรากำหนด โดยใส่รายละเอียดดังนี้
[
  {
    "role": "system",
    "content": "You are an automated email replier. Please generate a response email in a proper email format. If some details are not specified, avoid using placeholders (e.g., if the customer does not mention their name, use 'Dear valued customer'). Use the following information to assist with responses if relevant:\n\n## Company Info\nCustomer Representative: Peter (contact@cooltech.com)\n\n## Hair Care Product Information\n### 1. Recommended Products for Different Hair Types:\n- **Dry Hair:** Hydrating Shampoo & Conditioner with Argan Oil – Deeply nourishes and restores moisture.\n- **Curly Hair:** Curl Defining Cream – Enhances curls while reducing frizz.\n- **Color-Treated Hair:** Color-Protect Shampoo – Sulfate-free formula that preserves color vibrancy.\n\n### 2. Free from Harsh Chemicals:\nAll our products are **sulfate-free, paraben-free, and silicone-free** to ensure gentle care for your hair and scalp.\n\n### 3. Sample Sizes or Trial Kits:\nWe offer a **travel-size kit** featuring our best-selling shampoo, conditioner, and hair mask for first-time users.\n\n### 4. Ingredients & Benefits:\n- **Argan Oil** – Deep hydration and shine\n- **Keratin** – Strengthens hair and reduces breakage\n- **Aloe Vera** – Soothes the scalp and promotes healthy hair growth\n- **Coconut Oil** – Enhances softness and prevents split ends\n\n### 5. Where to Purchase & Discounts:\nOur products are available on **our official website, Amazon, and select beauty retailers**. First-time customers can enjoy **10% off their first order** by signing up for our newsletter."
  }
]
7. เพิ่มคำตอบจาก Ask ChatGPT Node ลงใน Body ของ Send Email Node
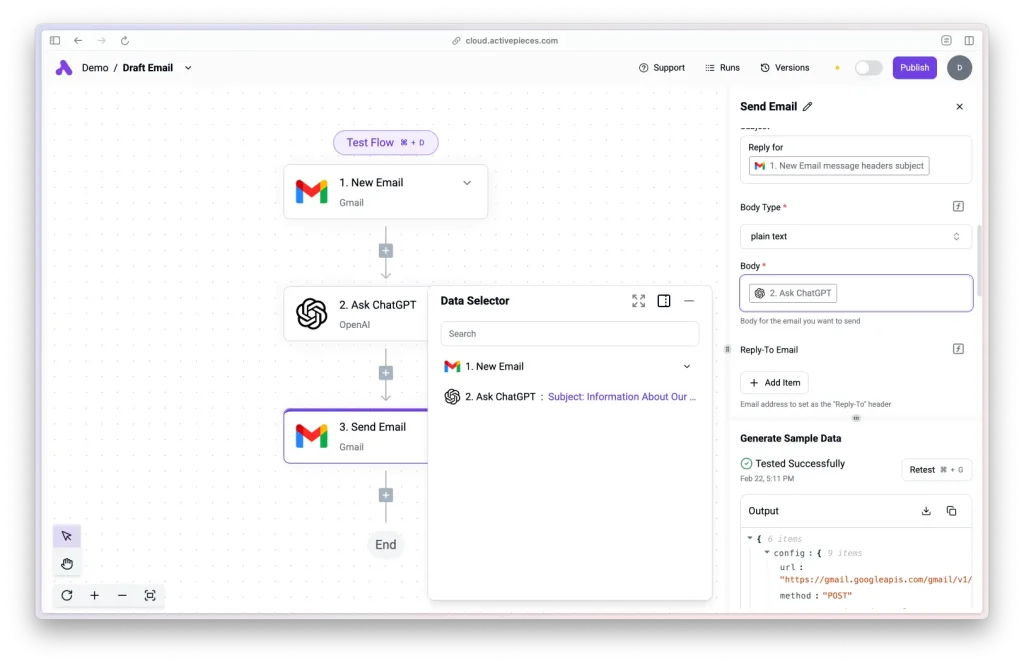
เพิ่มคำตอบจาก Ask ChatGPT Node ลงใน Body ของ Send Email Node โดยไปที่ Send Email Node แล้วเปลี่ยนตรง Body เป็น การดึงข้อมูลจาก Ask ChatGPT แทน
8. ทดสอบการทำงาน และกด Publish เพื่อใช้งานจริง
ทดสอบทั้งระบบ และใช้งานจริงแบบอัติโนมัติ
- กด Test Flow เพื่อทดลองใช้งานทั้ง Flow
- กด Publish และ Enable Flow เพื่อใช้งาน Flow แบบอัติโนมัติ
ไฟล์สำเร็จรูป และแหล่งอ้างอิงอื่น ๆ
- ไฟล์ Template Activepices สามารถกดเพื่อ Copy Workflow ไปใช้เพื่อทำงานต่อได้เลย โดยกดเลือกที่ Activepieces Template
แนวทางการต่อยอดเพื่อใช้งานจริงใน Project นี้
- ออกแบบให้ Workflow ของ Activepieces ทำงานเฉพาะอีเมลที่เกี่ยวข้องกับการสอบถามข้อมูลเรื่องสินค้าเท่านั้น เช่นมีการกรองอีเมลที่ไม่เกี่ยวข้องออกไป หรือกรองอีเมลสแปมออก
- ออกแบบให้ Workflow ของ Activepieces สามารถอ่านข้อมูลสินค้าปัจจุบันในระบบได้ เช่น เพิ่ม Node ในการอ่านข้อมูลรายละเอียดสินค้าจาก Google Sheet
คำถามที่พบบ่อยเกี่ยวกับ Project นี้
ยังไม่มี
บทความที่เกี่ยวข้อง

แก้ปัญหาแบบฟอร์มติดต่อใน WordPress ด้วยการส่งข้อมูลจาก Contact Form 7 ไปยัง Google Sheet ผ่าน Activepieces แบบไม่ต้องเขียนโค้ด เพื่อจัดการข้อมูลลูกค้าอย่างเป็นระบบและมีประสิทธิภาพ
![[Workshop] สร้างระบบแจ้งเตือน Telegram bot เมื่อใกล้กำหนดส่งงาน แบบ No-Code ด้วย Activepieces ใน 30 นาที](https://datayolk.net/wp-content/uploads/2025/06/VC12-360x180.webp)
เรียนรู้แนวทางการสร้าง Workflow ส่งข้อความแจ้งเตือนส่งงานผ่าน Telegram Bot แบบอัตโนมัติ ด้วย Activepieces โดยไม่ต้องเขียนโค้ด

แนะนำ Activepieces โปรแกรมสร้าง Automation น้องใหม่แบบ Low-Code ที่มีฟรี Plan เหมือน Make.com แต่สามารถ Self-host ได้แบบ n8n ทำให้เหมาะกับทั้งมือใหม่ และมือเก๋า
![[Workshop] สร้างระบบส่งเกียรติบัตร (Certificate) อัตโนมัติผ่าน Email ด้วย Activepieces ฟรี !](https://datayolk.net/wp-content/uploads/2025/05/VC7-360x180.webp)
เรียนรู้แนวทางการสร้าง Workflow สร้างเกียรติบัตร (Certificate) แบบอัตโนมัติพร้อมส่ง Gmail ฟรี ด้วย Activepieces โดยไม่ต้องเขียนโค้ด